Learn how to write your first code in React with this easy guide for beginners. Start building interactive web applications today!

Table of Contents
- Understanding the Basics of React
- Setting Up Your Development Environment
- Creating Your First React Application
- Exploring the Project Structure
- Understanding React Components
- Creating Your First React Component
- Working with Props in React
- Lists and Keys in React
- Deploying Your React Application to GitHub Pages
- Conclusion
- FAQs
So, you've decided to dive into React, one of the most popular JavaScript libraries out there? Awesome choice! React is not just a tool; it's a game-changer for building dynamic, fast, and scalable web applications. But if you're new to React, it might seem a bit overwhelming at first. Don't worry—by the end of this guide, you'll be well on your way to writing your first React code. Ready? Let’s get started!
Understanding the Basics of React
Before we jump into writing code, let's get familiar with what React is all about.
What is React?
React is a JavaScript library developed by Facebook for building user interfaces, especially single-page applications where you need a fast, responsive UI. Unlike traditional approaches, React works by breaking the UI into small, reusable components, making your code more manageable and scalable.
Core Concepts: Components, JSX, and State
To understand React, you need to get comfortable with three core concepts:
- Components: The building blocks of any React application. Think of them as self-contained pieces of UI.
- JSX: A syntax extension that looks like HTML but is actually JavaScript. It makes writing React components easier and more intuitive.
- State: A way to manage data within components that can change over time. State allows your app to be interactive.
The Importance of Components in React
Components are the heart of React. By creating reusable components, you can easily build complex UIs that are maintainable and scalable. For example, a button, a form, or an entire webpage can be a component in React.
Setting Up Your Development Environment
To start coding in React, you'll need to set up your development environment. Here's what you need:
- Node.js and npm: React relies on Node.js, a JavaScript runtime, and npm (Node Package Manager) to manage packages and dependencies. You can download and install them from the official Node.js website.
- Code Editor: Visual Studio Code (VS Code) is highly recommended due to its rich ecosystem of extensions tailored for JavaScript and React development.
Installing Node.js and npm:
- Visit the Node.js website.
- Download and install the recommended version for your operating system.
- Verify the installation by opening a terminal and typing:
node -v
npm -v
Setting up Visual Studio Code for React development:
- Download and install Visual Studio Code.
- Install the ES7+ React/Redux/React-Native snippets extension to boost your productivity when writing React code.
Creating Your First React Application
With your environment set up, it's time to create your first React application. The easiest way to get started is by using Create React App, a command-line tool that sets up a new React project with all the necessary configurations.
Using Create React App:
- Open VS Code: Launch Visual Studio Code on your computer.
- Open Your Project Directory: Press the shortcut keys
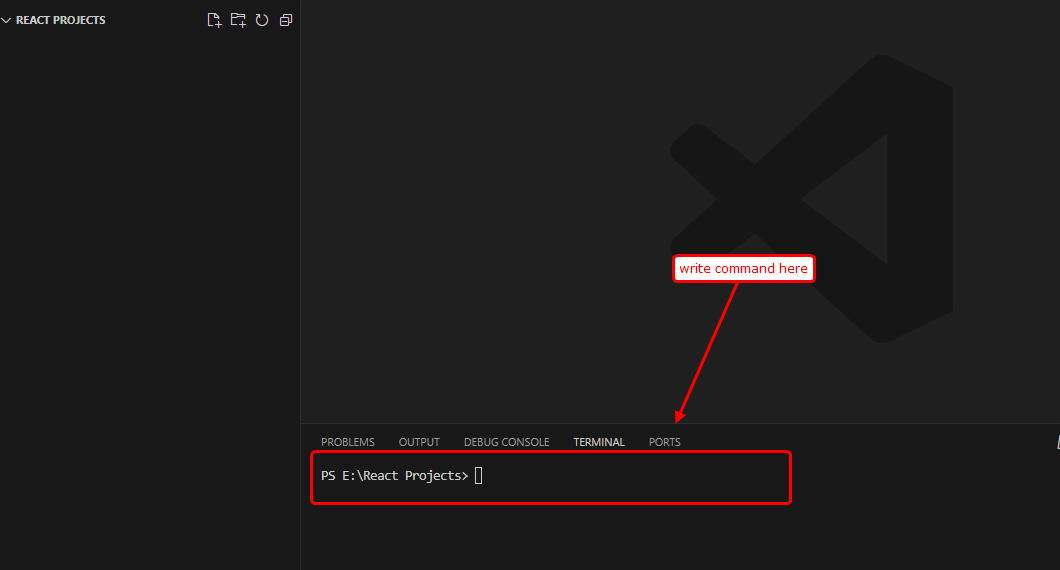
Ctrl + K, thenCtrl + Oto select and open the folder where you want to create your React app. - Installing Create React App: Create React App is a command-line tool that allows you to set up a new React project with a single command. It comes pre-configured with all the essential tools you need to start building your React application. To install Create React App, Press
Ctrl + Shift + `to open a terminal in VS Code and run:npm install -g create-react-app
- Create a New React Project: In the terminal, run the following command to create a new React app:
npx create-react-app my-first-react-appReplace
my-first-react-appwith your preferred project name. - Navigate into your project directory: After the app is created, move into your project directory by running:
cd my-first-react-app - Start the development server:
npm startThis command will open your default web browser and load the app at
http://localhost:3000.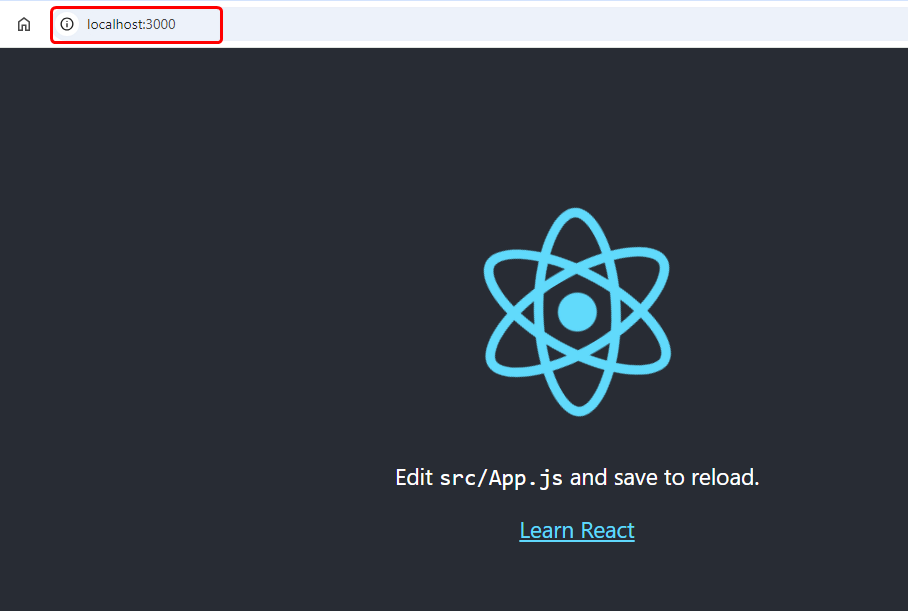
Exploring the Project Structure
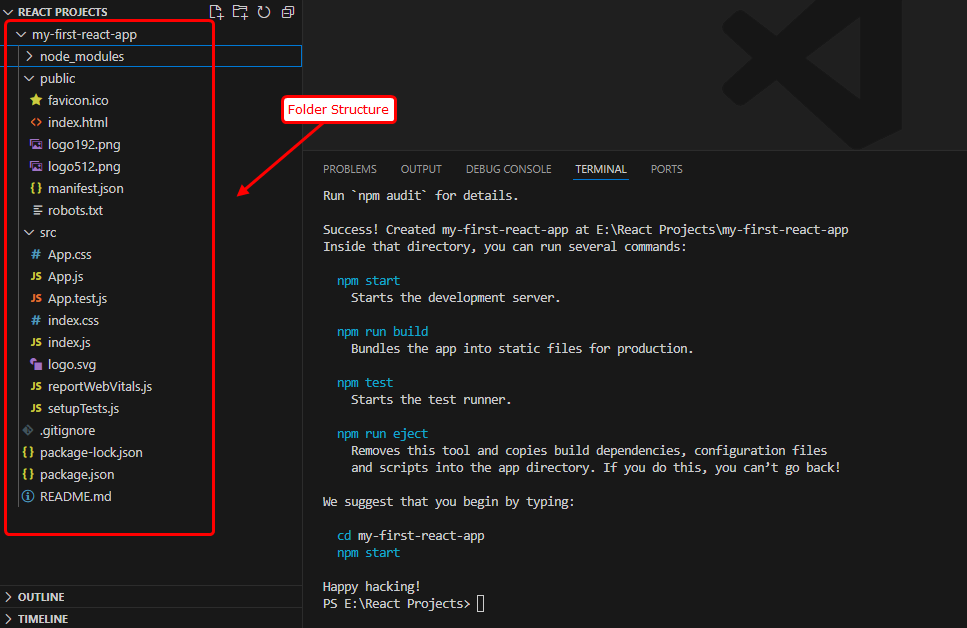
Your React app is now up and running, but what do all these files and folders mean?
Understanding the Files and Folders in a React Project
When you open your project folder, you'll see several files and directories. Here’s a quick overview:
public/: Contains static assets likeindex.html.src/: The main folder where you'll write your React components.node_modules/: Contains all the dependencies your project needs.package.json: A file that holds your project’s metadata, scripts, and dependencies.
Key Files: index.js and App.js
index.js: The entry point of your React app. It renders the App component into the DOM.App.js: The main component of your app. It’s a great place to start writing your own components.
The Role of package.json
package.jsonis crucial as it tracks the packages your project depends on, scripts you can run, and other metadata like your project’s name and version.
Understanding React Components
What are Components?
In React, everything revolves around components. A component is a self-contained piece of UI that can be reused throughout your application. Components can be as simple as a button or as complex as an entire form. There are two types of components in React: functional and class components.
Functional vs. Class Components:
- Functional Components: Simple functions that take props as arguments and return JSX. Ideal for simpler UIs.
Example:
function Welcome(props) { return <h1>Hello, {props.name}</h1>; } - Class Components: More feature-rich, these are ES6 classes that can manage their own state and lifecycle methods.
Example:
class Welcome extends React.Component {
  render() {
    return <h1>Hello, {this.props.name}</h1>;
  }
}
For your first code, we'll stick to functional components as they are easier to understand and use.
Creating Your First React Component
Setting Up Your First Component
- Open the
srcfolder in your project and create a new file calledMyFirstComponent.js. - Add the following code to create a simple React component:
import React from 'react';

function MyFirstComponent() {
  return <h1>Welcome to My First React Component!</h1>;
}

export default MyFirstComponent;
Adding JSX to Your Component
JSX stands for JavaScript XML looks like HTML but allows you to write elements inside your JavaScript code. In the example above, <h1>Welcome to My First React Component!</h1> is JSX.
Rendering the Component to the DOM
To see your component on the screen, import it into src/App.js and include it in the render:
import React from 'react';
import MyFirstComponent from './MyFirstComponent';

function App() {
  return (
    <div className="App">
      <MyFirstComponent />
    </div>
  );
}

export default App;
Now, your component will be rendered inside the App component, and you’ll see “Welcome to My First React Component!” on the screen.
Adding Styles to Your Component
You can style your component using regular CSS. The index.css file already exists in the src/ directory. You can add your styles there, and they will automatically be applied to your component:
/* index.css */
h1 {
  color: blue;
}
Working with Props in React
Passing Data to Components
Props (short for "properties") allow you to pass data from one component to another. They are similar to function arguments but for components.
Using Props in a Component
Let’s modify the MyFirstComponent component to accept a prop:
import React from 'react';

function MyFirstComponent(props) {
  return <h1>Welcome to My First React Component, {props.name}!</h1>;
}

export default MyFirstComponent;
You can now pass a name prop to the App.js component when rendering it:
import React from 'react';
import MyFirstComponent from './MyFirstComponent';

function App() {
  return (
    <div className="App">
      <MyFirstComponent name="Faraz"/>
    </div>
  );
}

export default App;
Lists and Keys in React
When rendering multiple elements in React, you’ll often work with lists and keys.

- Rendering Lists in React: You can render a list of items using the
map()function:import React from 'react'; function MyFirstComponent(props) { const items = ['HTML', 'CSS', 'JavaScript']; return ( <> <h1>Welcome to My First React Component, {props.name}!</h1> <ul> {items.map((item, index) => ( <li key={index}>{item}</li> ))} </ul> </> ); } export default MyFirstComponent;JSX elements must be wrapped in a single parent element with a<div>or React Fragments (<>and</>). - Understanding Keys in React: Keys help React identify which items have changed, are added, or are removed. Always assign a unique key to list items.
- Best Practices for List Rendering: Use stable and unique keys to prevent unnecessary re-renders and improve performance.
Deploying Your React Application to GitHub Pages
Step 1: Install Git
Before deploying your React application, you need to install Git if it’s not already installed.
1.1 Install Git
Windows:
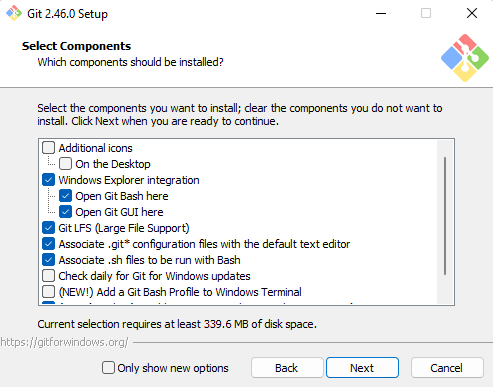
- Download the Git installer from the official Git website.
- Run the installer and follow the setup instructions. Make sure to select the option "Git from the command line and also from 3rd-party software" when configuring the PATH environment.
macOS:
- Open the Terminal.
- Install Git using Homebrew:
brew install git
- Alternatively, download the installer from the official Git website.
Linux:
- Use your package manager to install Git. For example, on Debian-based systems:
sudo apt-get install git
1.2 Verify Git Installation
After installing Git, verify that it's correctly installed by running:
git --version
Step 2: Prepare Your React App for Deployment
2.1 Build the React App
When you're ready to deploy, you need to create an optimized production build of your app. Run:
npm run build
This creates a build directory with all the static files necessary for deployment.
Step 3: Initialize a Git Repository and Push to GitHub
3.1 Set Up Your GitHub Repository
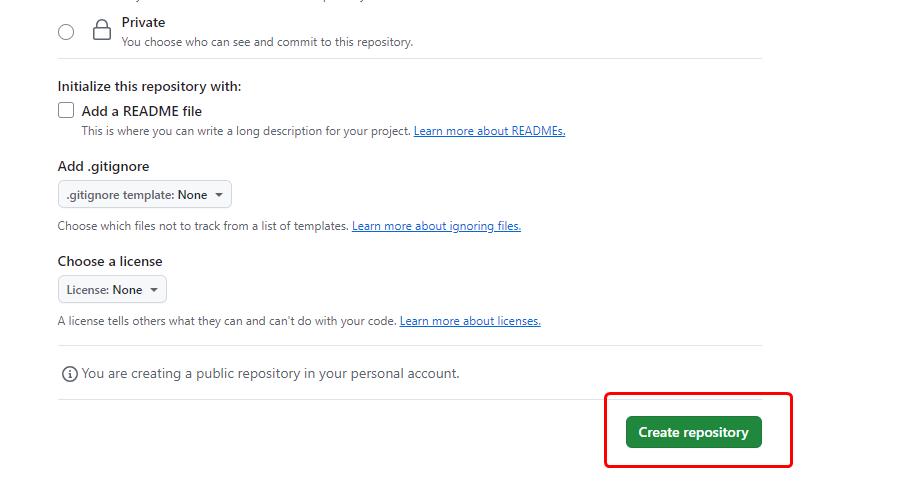
Create a new repository on GitHub. Do not initialize it with a README, .gitignore, or license.
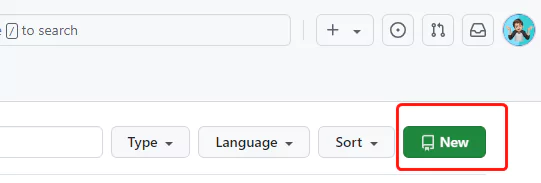
1. Click on the New Repository
2. Give any name to your Repository
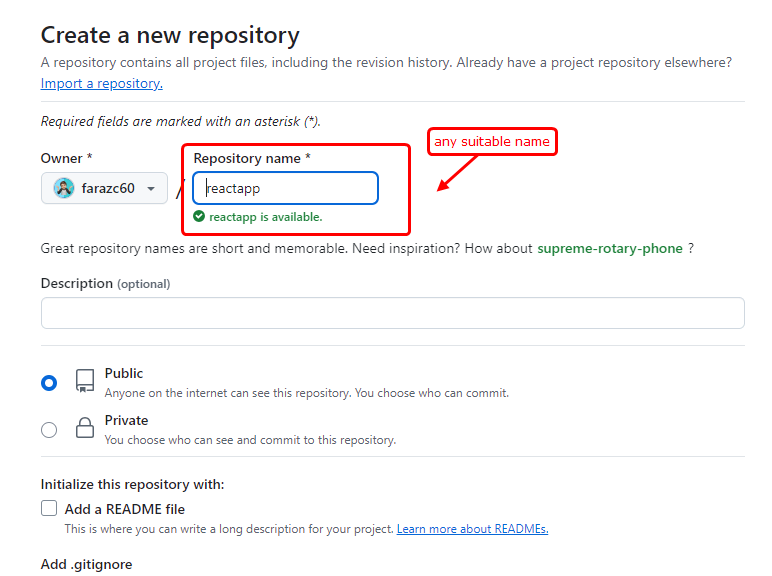
3. Click on the Create Repository button
3.2 Initialize a Git Repository
1. In your terminal, initialize a new Git repository in your React app's directory:
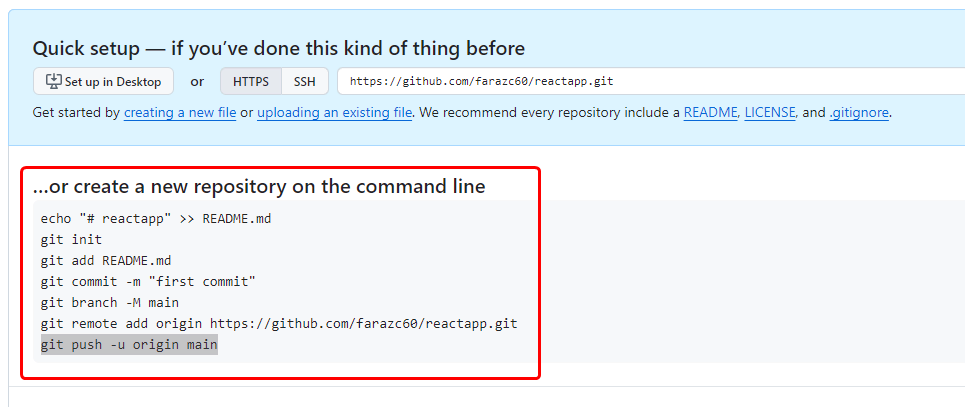
git init
2. Add Files to the Repository:
git add .
3. Commit Your Changes:
git commit -m "Initial commit"
4. Rename Branch to main:
git branch -M main
3.3 Push to GitHub
1. Add Remote Repository:
In your terminal, add the GitHub repository as a remote:
git remote add origin https://github.com/<username>/<repository-name>.git
Replace <username> with your GitHub username and <repository-name> with your repository's name.
2. Push your code to the remote repository:
git push -u origin main

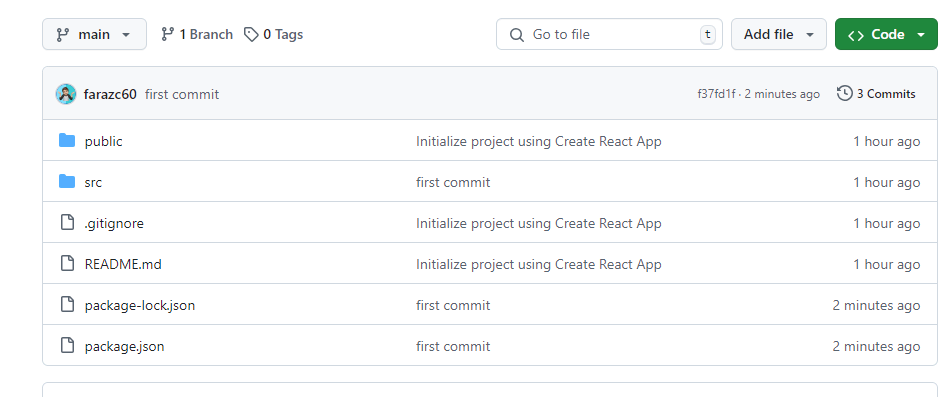
After successfully pushing to GitHub Pages, you will see your page like this:
Step 4: Deploy Your React App to GitHub Pages
4.1 Install gh-pages:
In your project directory, install the gh-pages package:
npm install gh-pages --save-dev
4.2 Update package.json:
Open the package.json file in your project and add the following under the scripts section:
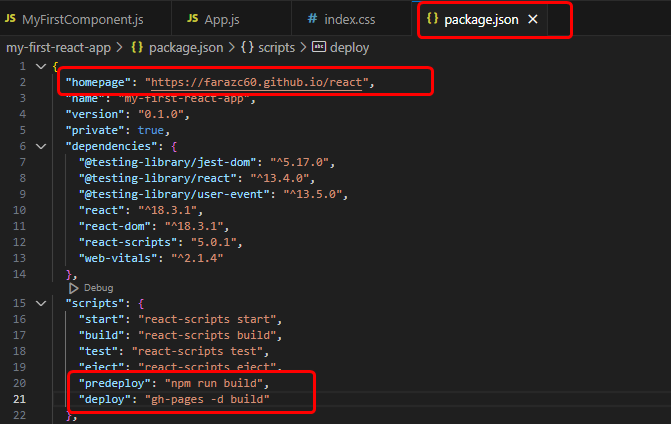
"homepage": "https://<username>.github.io/<repository-name>",
"scripts": {
  "predeploy": "npm run build",
  "deploy": "gh-pages -d build"
}
Replace username and repository-name with your GitHub username and repository name.
4.3 Deploy the App:
Run the following command to deploy your app:
npm run deploy
4.4 Access Your Deployed App:
Your React app will be live at https://<username>.github.io/<repository-name>.

Conclusion
Congratulations! You've written your first code in React and learned the basics of creating and managing a React application. React is a powerful tool, and while we've only scratched the surface, you now have a solid foundation to build on. The key to mastering React is practice, so keep experimenting, building projects, and exploring more advanced features.
FAQs
What is React used for?
React is used for building user interfaces, particularly single-page applications. It helps create interactive and dynamic web pages.
How do I install React?
Install React using Create React App, which sets up a new React project for you. Use the command npx create-react-app my-app.
What are props in React?
Props (short for properties) are used to pass data from a parent component to a child component.
How can I deploy a React application?
Build your application using npm run build and deploy it to hosting platforms like Netlify, Vercel, or GitHub Pages.
How do I start learning React?
Begin with the official React documentation, practice by building small projects, and gradually move to more complex applications.
What is the best way to practice React?
Build projects, contribute to open-source projects and follow tutorials and coding challenges to strengthen your skills.
Can I learn React without JavaScript?
It’s important to have a strong foundation in JavaScript before learning React, as React is a JavaScript library.
What are the common challenges faced by beginners?
Understanding JSX, managing state, and dealing with props can be challenging initially, but with practice, they become easier.
How do I optimize a React application?
Use techniques like code-splitting, lazy loading, and memoization to optimize performance.
Can I build mobile apps with React?
Yes, you can build mobile apps using React Native, which is a framework based on React for building mobile applications.
What is the difference between React and React Native?
React is used for building web applications, while React Native is used for building mobile applications.
That’s a wrap!
Thank you for taking the time to read this article! I hope you found it informative and enjoyable. If you did, please consider sharing it with your friends and followers. Your support helps me continue creating content like this.
Stay updated with our latest content by signing up for our email newsletter! Be the first to know about new articles and exciting updates directly in your inbox. Don't miss out—subscribe today!
If you'd like to support my work directly, you can buy me a coffee . Your generosity is greatly appreciated and helps me keep bringing you high-quality articles.
Thanks!
Faraz 😊


